When it gets too thin to weld, it will vaporize before you can establish a puddle. Before You blink, you have another hole. The heat of the arc should be on the thickest of the two metals being welded. In a case like this the thinnest metal cracked at the edge of the weld. Typically that's where a weld should break under stress, even if in new condition. the problem of rust is even worse inside the muffler as it is separated from the opposite end on the inside.
SAFETY FIRST!
To fix it, I cut a piece of 3" galvanized pipe to length at 15".
2 strips of 18 Gauge 1 1/2"wide X 4"long. Mark center of the width at 3/4" on both ends.
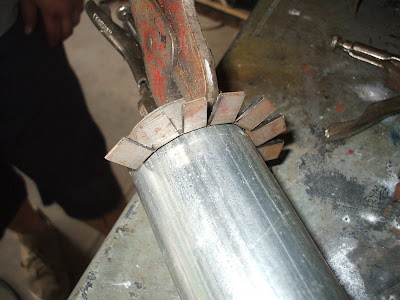
Insert in 4" vise to the center line and securely clamp. Fold it over to 90 degrees by pounding it over with the end of a short 2 x 4, and a medium hammer. Two good cracks with that hammer and you have a mini angle. Then cut slices in one face about 3/8" apart with a 4-1/2"cut off wheel. I used the 7" Dewalt .045 in the picture.
hmm.. pie x the radius squared!
Let's be practical here, just form both halves of the flange to fit the pipe by wrapping it around the pipe, then reverse it so the flange is flush with the end of the replacement tube, tack it to the new tube. Trim second flange to fit with cut off wheel and tack in place.
If satisfied, weld solid to pipe 360 degrees while it is separate from the muffler.
Test fit the flanged tube, and trim tabs to fit the back of the muffler with the old hole centered in the tube. Make alignment marks if you wish, or just fire a tack on the top tab to hang it like I did.
If you are lucky you'll still have those two perfect bungee cords to hold it in one place while tacking the new tube. In this case I used my photographer's helping hand.
Remember safety, before welding on any vehicle, it is recommended to disconnect the battery ground cable. I connect the ground cable to the new clean replacement tube to eliminate that intermittent spark at the very beginning of the welding process due to ground problems.
The new tube is the root metal, it will carry the heat of the arc and allow you to just melt the edge and bond to the much thinner muffler case. use a small weave if you like.

Tack to the back of the muffler enough to secure and enjoy the project!
For me, the project was just good practice to see if I can save the kid, oops! I mean, man child a few bucks. Something inside still vibrates but it sounds like a 4 cylinder school bus crossover now. That don't matter though, you can still hear the stereo thumping a quarter mile away!
I did this with an old Lincoln Arc Weld Pack 100 112volt welder I purchased new around 1989 or so.
- I used Hobart .030" wire, gas less - flux core
- heat high on the new tube , wire speed just under 3 on scale.
- heat low when welding the flange tabs to the muffler, wire speed about 2-1/4 on scale.
Josh did his midnight run to the gopher state later that night without a hitch. The good news is, I finally got my spark pictures, and got them posted to boot!


0 comments:
Post a Comment
If you found any of this information helpful please contact me, or leave a comment pertaining to one of these posts.
Thank You in advance, Harvey O'hillbilly