Monday, August 31, 2009

$20.00 bucks and a 12-Pack!

Here's the problem with welding rusty exhaust tube.


When it gets too thin to weld, it will vaporize before you can establish a puddle. Before You blink, you have another hole. The heat of the arc should be on the thickest of the two metals being welded. In a case like this the thinnest metal cracked at the edge of the weld. Typically that's where a weld should break under stress, even if in new condition. the problem of rust is even worse inside the muffler as it is separated from the opposite end on the inside.


SAFETY FIRST!

To fix it, I cut a piece of 3" galvanized pipe to length at 15".

2 strips of 18 Gauge 1 1/2"wide X 4"long. Mark center of the width at 3/4" on both ends.
Insert in 4" vise to the center line and securely clamp. Fold it over to 90 degrees by pounding it over with the end of a short 2 x 4, and a medium hammer. Two good cracks with that hammer and you have a mini angle.

Then cut slices in one face about 3/8" apart with a 4-1/2"cut off wheel. I used the 7" Dewalt .045 in the picture.

hmm.. pie x the radius squared!
Let's be practical here, just form both halves of the flange to fit the pipe by wrapping it around the pipe, then reverse it so the flange is flush with the end of the replacement tube, tack it to the new tube. Trim second flange to fit with cut off wheel and tack in place.
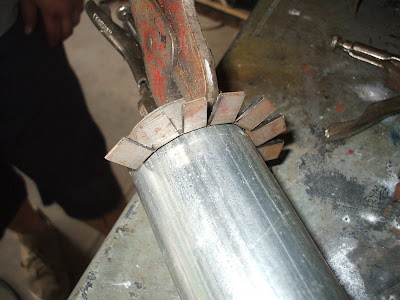
If satisfied, weld solid to pipe 360 degrees while it is separate from the muffler.


Test fit the flanged tube, and trim tabs to fit the back of the muffler with the old hole centered in the tube. Make alignment marks if you wish, or just fire a tack on the top tab to hang it like I did.

If you are lucky you'll still have those two perfect bungee cords to hold it in one place while tacking the new tube. In this case I used my photographer's helping hand.

Remember safety, before welding on any vehicle, it is recommended to disconnect the battery ground cable. I connect the ground cable to the new clean replacement tube to eliminate that intermittent spark at the very beginning of the welding process due to ground problems.

The new tube is the root metal, it will carry the heat of the arc and allow you to just melt the edge and bond to the much thinner muffler case. use a small weave if you like.


Tack to the back of the muffler enough to secure and enjoy the project!

For me, the project was just good practice to see if I can save the kid, oops! I mean, man child a few bucks. Something inside still vibrates but it sounds like a 4 cylinder school bus crossover now. That don't matter though, you can still hear the stereo thumping a quarter mile away!

I did this with an old Lincoln Arc Weld Pack 100 112volt welder I purchased new around 1989 or so.

  • I used Hobart .030" wire, gas less - flux core
  • heat high on the new tube , wire speed just under 3 on scale.
  • heat low when welding the flange tabs to the muffler, wire speed about 2-1/4 on scale.

Josh did his midnight run to the gopher state later that night without a hitch. The good news is, I finally got my spark pictures, and got them posted to boot!

God I loved the sound of glasspaks on my ride!


Remember I wanted to get some pictures of them sparks? I got a few of this quick fix idea too.

Just last weekend, I fixed the front end of this very same muffler. Simple as pull, the tire, place the jack stands, and come get me, and we'll see if I can bond the two back in place with a half weld that will hold until you get a 30 pound ice ball hangin off the back of it! Basicly my weld was similar to the broken weld you see above. Something like this can last a long time if done correctly. You see the problem is not the weld it is the area around the weld that is already well on its way to flaking away to nothing.

I looked at the back end and saw two nice welds and thaught to my self they're ready to crack out with in six months because that 5" chrome player "pipe extension" banged off the bottom of the bumper of the car for how many miles before you came home? Well this episode is about how I come to figure the kid, (my Manchild) now owes me a $20.00 bill and a 12-pack for the ol' fridge!

My general rule of thumb is that a muffler is not worth repairing only replacement! But I've been there myself, young, working to pay the bills, your rent, and money's tight, dad!

I ask him, "did you take the crome pipe piece off before, or after, the pipe broke?".
He smiles and says "After",

"So you wouldn't lose it, right?".

Friday, August 28, 2009

Arc welders may have hotter rods, but Tig welders get deeper penetration! - elifIknow?

"$parks'a flyin"!


Before I head out to the ol' man cave to finish welding the last of 12 carts, I must wait for my man-child to fetch some new brake pads for his new/used Honda, and then come home. You know he'll want to use my tools, and then want my help. That's OK, son, I want you to carry those big heavy boxes downstairs to the basement. But the real reason I'm waiting for him is so HE can operate the camera and maybe get a pretty picture of some "sparks'a flyin"!

This won't be the last opportunity for pictures, but I want some spark pictures with my first article because this is about the effort you make to reach your goals. The steps you take to insure your best results.

My first attempt at spark pictures failed big time!, you can't always do every thing yourself. Strike and float a pretty "one handed" bead, and shoot a decent photo with the other hand, while looking through the ol' Speed Glass welding helmet!
hmm... how do I get around that 1/10 of a second timing thing in the helmet? Is the auto flash even visible against the arc flash? Turn it off for longer exposure? hmm... I'll figure it out later.

Back to the project. in the photo today is the fixture I made to fit out side the leg of the cart because of the inside radius. I found two pieces of straight metal about a foot long, and lap welded them together to serve as an alignment guide. Two clamps to the leg ensure the leg extension remains in place when you clamp it secure. Then 3 good, solid tacks on the inside at the edges and in the corner will allow you to move on to the next leg, and so on... when all 4 legs are extended double check your diagonal measurements for square. Any thing within an inch is cool at this point, any thing more than that may be pulled in to the bottom when it is reattached. this is a simple solution to this project, more examples later.

Thursday, August 27, 2009

Workin it!


Well more than a few weeks have gone by now and I see I still must finish the How to series I started! Welding Season in Wisconsin starts with the spring thaw, and ends with deep snow!
Let's see, since the first post on the subject of working your welding skills for yourself, I've amassed more than a few points I want to tell you about as I have encountered them. There are a lot of issues to consider from advertising, to safety, as well as the welding process itself. That's the fun part for me, and I hope that this blog can help it be fun for you too.
I envision a bunch of you independent minded folks, who might have a little too much time on your hands lately, might be puttin a few extra hours in the ol' man cave lately. You know, buffin the shine on that lawn mower. Thinking to yourself Where's the "sparks?" or "give me something to grind! uhra! Maybe you want to design and build that remote control gate opener you've always wanted, or a bike rack to keep the kid's bikes of the ol' drive way this next summer.
You are the audience I want to hear from if you can feel the call to build something! I am going to start the ball rolling by telling my story about a cart and how it expanded to 38 custom pedestals and more. Like how I will recycle some of the steel for a cool roll bar for my zero turn bobcat! Why? because I can and so can you! My endeavor is to find real grass roots folks who's passion is welding, for Fun and profit. Build your project, take some pictures, and share your story. I got the Idea from Handy Man Club of America, but I will not enroll you into some DVD of the month club!
If you've watched Monster Garage or Build it Bigger, or just would like to document your project for your memoirs tag this blog and join in the fun. Who knows what cool ideas are floating around out there? What cool things can we come up with? hmm...
The photos above are my latest project, a local company asked me to refurbish a dozen tables or carts as you can see. They came from a closed down factory out east. I was asked to make them 9" taller, and clean them up. One of the bigger ones was cut in half and made into three smaller carts.
Before and after as well as in between photos will follow in upcoming posts.