Showing posts with label welding. Show all posts

Monday, February 15, 2010

Phoenix day 3, Mission accomplished!


Note the tabs were some nice laser cut left overs from some other job in my past.

They were drilled, and then counter sunk with a 9/16 " drill bit and then I bolted the nuts in place prior to welding them.

By doing this you are assured nothing is going to warp or move off of center in the hole.

Note the top plates extensions are now only 1/8 " from the frame . No way can a 5/8" board get in under the arm of the springloaded top plate now!r>< span>r>


Meanwhile on the other end of the phoenix the virtacle support needed to be offset.

A horizontal cut at 3/16 " all the way around the top to remove the inserted tube cap leaves me at the same hight as the origional height.

The same procedure was used for the 1/2" 16 tpi nuts on the 2 X 3.5 canteleeverd cap.


Unfortunately the grey touch up paint did not exactly match but that was considered to be insignificant as the customer was extrememly happy with the final product.

The feed back so far is all accolades for a job well done.

March will bring a new challenge when they install a new all in one Sheeter from K-Mec located in Spain.

I have already placed a bid on another project for the trim cutter platform.

While this may have been one of my more complicated projects at first glace, you can see how I broke it down to basic processes and steps to keep it simple.

My best advice is to double check every thing twice and tack once! here's wishin ya good reviews on your projects and ya'll come back now, y'hear?

I've recently added a facebook link widget to my blog if you should like to offer me a poser of a question or just suggest a subject you are interested in concerning my passion for Welding.

Wednesday, February 3, 2010

4 Hours on the Phoenix, Day 1

I don't want this to read like a Chilton Manual because on this job I don't want to open any wiring if I don't have to, so I look for ways to achieve that goal.

Look at the before and after pictures in my last post as I describe why I disassembled it the way I did. Maybe you know what I mean, that state of shock begins to wear off as I realise none of the "fancy components" have been removed.

hmm... good thing I was a Boy Scout as a kid!

If I'm gonna keep my time line of three nights, better to just roll up your sleeves and get to work!

After circleing the machine several times it all fell into place. the plan is pretty basic.

Loose Plexiglas remove plexiglass shield from top assembly, to allow enough slack in cables from the motor to allow for the removal of the push-bar assembly.

Unbolt and remove the conveyor assembly, note the powerlines are free from all clips and restraints.

The final obsticle to choping this thing apart is to remove the hydrolic pump and lines to the mast. By turning the elbow fitting located at the bottom of the mast I gained enought slack to place the pump assembly at the left rear corner of the machine to allow for a fork truck to get under the frame and lift it for the clearence needed to cut 360% on the frame.

I used jack stands to stabilise the frame.

The fork frame is chained to the top of the mast capacity so it can not fall while cutting on the frame like a gueiloteen.

Little tricks like putting the bolts back in to the holes they came from helps to keep things organised.

The 2" X 2" tube were easily cut off the 1/2" pads on the center frame. The 3" X 3" bottom tube is cut near the center of its span for reason of the plates it was welded to. A simple Tri-square and marker were used to guide the hand cuts.
Man I love my Dewalt grinder with the flush cut Type 27, 7" X .065" cut off wheels. They allow for easy correction, where as an 1/8 " wheel just takes too much steel away for a job like this! Remember safety and wear those eye shields!

So far, on this job I have used

  • a 1/2" ratchet w/ 3/4" 6 point deep socket
  • Torx head wrenches 9" T - handle assorted<<>
  • a 12" metric adjustable cressent wrench
  • Oh, my Grinder, he he ( not an endorsement, just braggin)
Next time, I talk a little on the welding and reassembly of the frame.

Wednesday, October 7, 2009

Listening is an open door to Understanding

How much better to get wisdom than gold!
And to get understanding is to be chosen rather than silver.

Proverbs 16:16

How many started out in this electronic wonderful Internet marketing world with expectations of silver and gold? I did! I would venture to say almost all of us did!

It usually starts with one well worded email letter and a click to a link to learn more and get a free gift! The next thing you know, you have some ebooks downloaded and now, you have everything you need to know to be rich!
Ya Right!, after you start reading into the book a few chapters you loose your focus and start thinking thoughts like auto-responder?, logos?, SEO, up=line?, list? Spam? what's spam? why must I research my keywords?

The days are not long enough when you consider learning how to do something as you discover it should have been done before you got this far! One of my 1st ebooks didn't even tell me I had to know HTML.
Had I failed something big? Now I've gotta learn another language?

Aw shoot, here come those negative what ifs, you know those words you say to yourself, could've, would've, or should've, They are secondary wanderings that cross the landscape of our mind from time to time. You know you can feel something is wrong but don't know exactly what. Is something missing? Am I selling to people who don't want to be "sold to?" hmm...

When I priced my education from the " school of hard knocks," I soon realized, I was going broke and nothing was making enough to pay the expenses! I heard things like you can write that expense off on your taxes, it's a business expense, Buy from your own business, that's going to generate a commission, but, why must I spend $200.00 a month on a ADR for a $55.00 commission when I am also spending $400.00 a month buying leads to call and sell your product, I wound up spending over $500 to earn $55? For 2-3 years? I don't think so! How is that sustainible?
You know, it seems like every call I make, is more like a recruiting call from a telemarketer? Because your product is so expensive, people ask themselves is this a want or a need? If only I didn't have to buy leads! If only I could find people who want to look young forever! No matter what the cost! If only.., if only.., if only, I had known that I could get educated for free while I learn how to help others! I would've started right from here! Not that business in a box!
I learned why it was not my fault! I learned to quiet the clutter in my mind, and how focus on myself, and my unique skills, not my short comings. The neatest thing is anyone will benefit! You don't have to join any other groups when every thing you want to know is only a question away! It all starts with a phone call "where you will learn how to think, not, what to think!"
Every one is welcome, there are no right or wrongs here, no companies are compared here, only what works for you.
Me? I'm really into Welding! I've been a skilled laborer for over 25 years! Now ask yourself why am I working w/ http://LHW.successin10steps.com/?mad=38910 ? I would ask you, if you didn't know enough about the Internet, how are you going to learn how to work the Internet with your passion? The School of Hard Knocks? Why go through that? Take the 1st step and check out the free ebook at the link above and see if you don't want to learn more. It won't cost you one thin Dime!

I Am Having Fun Building The Largest Most Profitable, Highest Retention Organization Ever Built In The History Of Network Marketing Easily And Consistently, Through Education And Teamwork.
Devote some time to yourself, for yourself. thanks,
Lenny

http://sta.rtup.biz/profile/LenWenzlick

Monday, August 31, 2009

$20.00 bucks and a 12-Pack!

Here's the problem with welding rusty exhaust tube.


When it gets too thin to weld, it will vaporize before you can establish a puddle. Before You blink, you have another hole. The heat of the arc should be on the thickest of the two metals being welded. In a case like this the thinnest metal cracked at the edge of the weld. Typically that's where a weld should break under stress, even if in new condition. the problem of rust is even worse inside the muffler as it is separated from the opposite end on the inside.


SAFETY FIRST!

To fix it, I cut a piece of 3" galvanized pipe to length at 15".

2 strips of 18 Gauge 1 1/2"wide X 4"long. Mark center of the width at 3/4" on both ends.
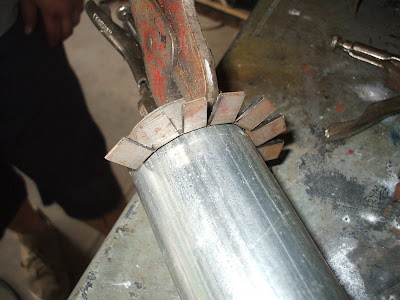
Insert in 4" vise to the center line and securely clamp. Fold it over to 90 degrees by pounding it over with the end of a short 2 x 4, and a medium hammer. Two good cracks with that hammer and you have a mini angle.

Then cut slices in one face about 3/8" apart with a 4-1/2"cut off wheel. I used the 7" Dewalt .045 in the picture.

hmm.. pie x the radius squared!
Let's be practical here, just form both halves of the flange to fit the pipe by wrapping it around the pipe, then reverse it so the flange is flush with the end of the replacement tube, tack it to the new tube. Trim second flange to fit with cut off wheel and tack in place.
If satisfied, weld solid to pipe 360 degrees while it is separate from the muffler.


Test fit the flanged tube, and trim tabs to fit the back of the muffler with the old hole centered in the tube. Make alignment marks if you wish, or just fire a tack on the top tab to hang it like I did.

If you are lucky you'll still have those two perfect bungee cords to hold it in one place while tacking the new tube. In this case I used my photographer's helping hand.

Remember safety, before welding on any vehicle, it is recommended to disconnect the battery ground cable. I connect the ground cable to the new clean replacement tube to eliminate that intermittent spark at the very beginning of the welding process due to ground problems.

The new tube is the root metal, it will carry the heat of the arc and allow you to just melt the edge and bond to the much thinner muffler case. use a small weave if you like.


Tack to the back of the muffler enough to secure and enjoy the project!

For me, the project was just good practice to see if I can save the kid, oops! I mean, man child a few bucks. Something inside still vibrates but it sounds like a 4 cylinder school bus crossover now. That don't matter though, you can still hear the stereo thumping a quarter mile away!

I did this with an old Lincoln Arc Weld Pack 100 112volt welder I purchased new around 1989 or so.

  • I used Hobart .030" wire, gas less - flux core
  • heat high on the new tube , wire speed just under 3 on scale.
  • heat low when welding the flange tabs to the muffler, wire speed about 2-1/4 on scale.

Josh did his midnight run to the gopher state later that night without a hitch. The good news is, I finally got my spark pictures, and got them posted to boot!

Friday, August 28, 2009

Arc welders may have hotter rods, but Tig welders get deeper penetration! - elifIknow?