Showing posts with label tips. Show all posts

Monday, August 31, 2009

$20.00 bucks and a 12-Pack!

Here's the problem with welding rusty exhaust tube.


When it gets too thin to weld, it will vaporize before you can establish a puddle. Before You blink, you have another hole. The heat of the arc should be on the thickest of the two metals being welded. In a case like this the thinnest metal cracked at the edge of the weld. Typically that's where a weld should break under stress, even if in new condition. the problem of rust is even worse inside the muffler as it is separated from the opposite end on the inside.


SAFETY FIRST!

To fix it, I cut a piece of 3" galvanized pipe to length at 15".

2 strips of 18 Gauge 1 1/2"wide X 4"long. Mark center of the width at 3/4" on both ends.
Insert in 4" vise to the center line and securely clamp. Fold it over to 90 degrees by pounding it over with the end of a short 2 x 4, and a medium hammer. Two good cracks with that hammer and you have a mini angle.

Then cut slices in one face about 3/8" apart with a 4-1/2"cut off wheel. I used the 7" Dewalt .045 in the picture.

hmm.. pie x the radius squared!
Let's be practical here, just form both halves of the flange to fit the pipe by wrapping it around the pipe, then reverse it so the flange is flush with the end of the replacement tube, tack it to the new tube. Trim second flange to fit with cut off wheel and tack in place.
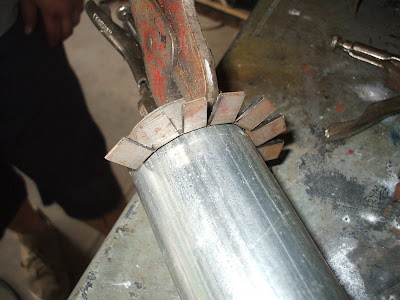
If satisfied, weld solid to pipe 360 degrees while it is separate from the muffler.


Test fit the flanged tube, and trim tabs to fit the back of the muffler with the old hole centered in the tube. Make alignment marks if you wish, or just fire a tack on the top tab to hang it like I did.

If you are lucky you'll still have those two perfect bungee cords to hold it in one place while tacking the new tube. In this case I used my photographer's helping hand.

Remember safety, before welding on any vehicle, it is recommended to disconnect the battery ground cable. I connect the ground cable to the new clean replacement tube to eliminate that intermittent spark at the very beginning of the welding process due to ground problems.

The new tube is the root metal, it will carry the heat of the arc and allow you to just melt the edge and bond to the much thinner muffler case. use a small weave if you like.


Tack to the back of the muffler enough to secure and enjoy the project!

For me, the project was just good practice to see if I can save the kid, oops! I mean, man child a few bucks. Something inside still vibrates but it sounds like a 4 cylinder school bus crossover now. That don't matter though, you can still hear the stereo thumping a quarter mile away!

I did this with an old Lincoln Arc Weld Pack 100 112volt welder I purchased new around 1989 or so.

  • I used Hobart .030" wire, gas less - flux core
  • heat high on the new tube , wire speed just under 3 on scale.
  • heat low when welding the flange tabs to the muffler, wire speed about 2-1/4 on scale.

Josh did his midnight run to the gopher state later that night without a hitch. The good news is, I finally got my spark pictures, and got them posted to boot!

Wednesday, June 3, 2009

From the web back to the welder!

This evening I got a call from the missus who asked me if I was interested in fabricating some carts for the company she works for. At first I thought it was a ploy to get me out of this chair which is parked in front of the computer. I mean why would I want to get up when this thing has wheels? I have often thought if it had a hole and a shield I wounld never leave the desk, for fear someone else might get access to my computer which has dominated too much of my time lately! I am glad that I did though, because after all my goal is to start my welding business! This is an opportunity I have been looking for!
This article is going to document the the process if any one you is a do it your selfer like I am. My intent is to tell you about the processes from the begining to the end.
Let's start with the call. Once you get one you must start thinking about the information you will need to know to get the job done and meet or exceed the customers expectations. In this instance I was asked to come in and speak with Dave the head of maintanence to gather the dimentions gain a perspective of the company's desires. My wife had mentioned she told them it takes her 3o minutes to get to work from home but she didn't leave me much time to prepair!
You must realize that when you enter a factory setting you must abide by their safety rules, so you must have some of the basics like steel toe shoes, safety glasses if you need a perscription you should have side shields, and so on.
I already have a note book organizer prepared for such occasions. It has pockets, paper pad, pen and a built in calculater,just in case my math skills get rusty. I would highly recommend having a tape measure clipped on some where as well. You never know when you are going to need one of those, and it lends something to the professional look as well.
Most companys have a sign in policy in place and a registry book for you to fill out when you arrive and leave etc. If you are just begginning your business and don't have a corporation name or name of your firm yet that's ok, you can simply use your name and service that you intend to perform, for example Wenzlick Welding or Welding Specialist. Something like this will go a long ways in lending credibility to your business in the future.
As with most companies you must wear ear protection when you enter the factory working area and after putting mine in we walked out to the floor. Use common sense when you are near equipment that is operating and practise standard safety proceedures like be aware of your surroundings at all times, or stay out of the way of forktrucks, keep your hands away from moving machinery,etc...
I got to see what they were using and learned why they wanted to improve it to suit their needs. In this case, the carts which hold 1/4" sheets of masonite boards used as dividers for the product didn't fit the space requirements and the dividers get nicked up on the edges. What they need is to protect the boards by making the carts narrower and they want to use stainless steel to meet American Bakery Standards for an upcoming certification.
This is where you will want to make sure you take notes and ask all of the questions you can think of to ensure you get everything you need to know to do the job right the first time! It is also important that you get specific contact information that will direct you back to the person you are speaking with just in case you miss a detail or need to ask another question via phone call. It is easy to have plans dancing around in your head while you are discussing the project and you might not catch a detail untill you are driving home like I did in this case. I asked for a week to get a plan submitted and approved so I wont sweat the detail untill then. This will also buy me time to make a drawing, get quotes for the resourses that I will need to build one, and figure an acceptable price that will bring me a profit. I will be posting more on this as the information is gathered.
In my future posts, I will give you the details of the project, dimentions, tips on searching for resourses, figuring production costs, you know, all to good stuff! If I can get video going, it will be better yet!